
Dry Rot Repair
"Dry rot" is a misleading name — the fungus that causes it needs sustained moisture to establish itself in framing, siding, and trim. Once it takes hold, it keeps spreading through wood fibers even after the surface looks dry again, which is why the same soft spot keeps coming back after a quick patch. We treat dry rot as a moisture problem first and a wood-replacement problem second.
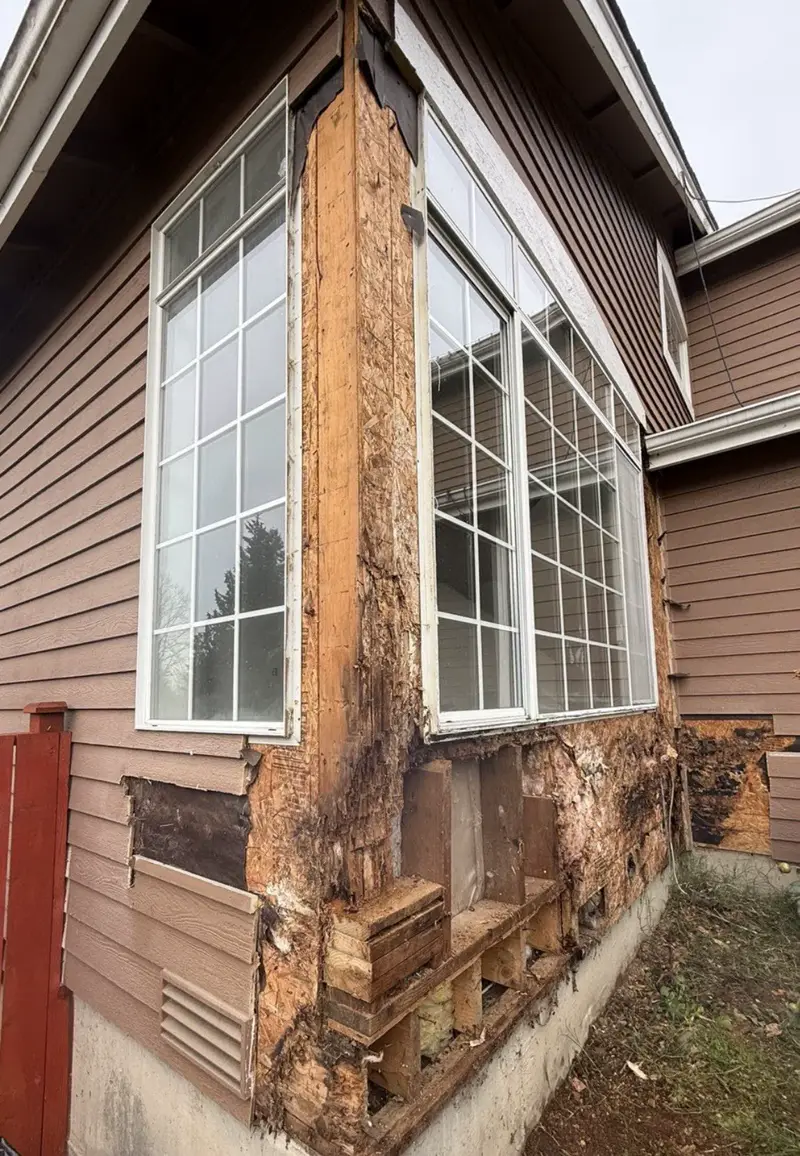 Before
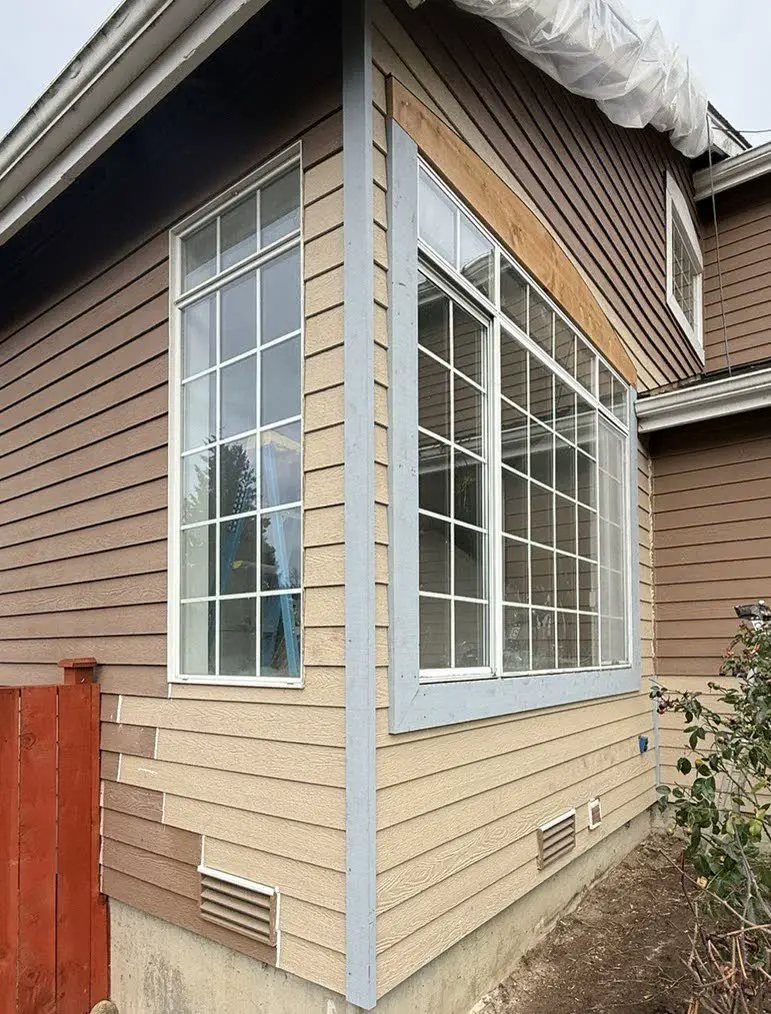 After
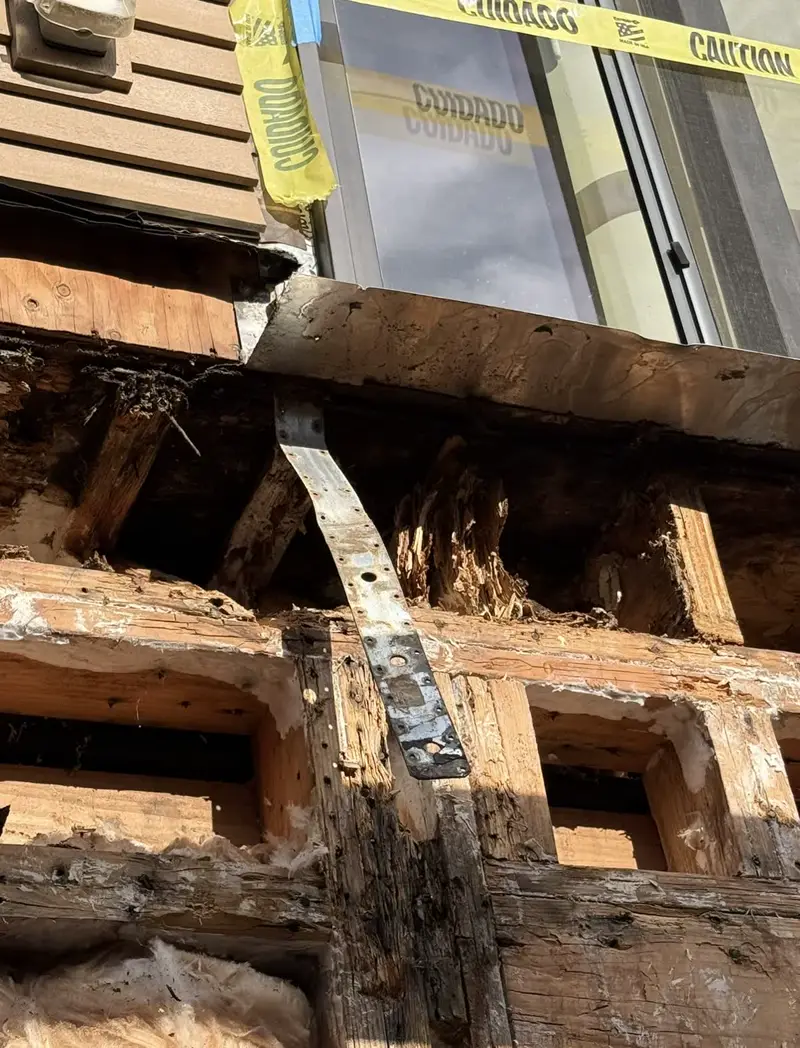
AfterRotted siding corner, opened up and rebuilt
Understanding dry rot repair in older and newer homes
Dry rot is a wood-decay fungus, not simple dampness, which is why the same soft spot so often comes back after a homeowner sands it, fills it, and repaints it. The fungus needs sustained moisture to establish itself, but once it has a foothold in framing, siding, or trim, it keeps consuming wood fiber even after the surface dries out between rainstorms. In a climate like ours, that means almost every case starts with an entry point that was never sealed correctly — not a single storm, but months or years of small amounts of water finding the same gap. We treat every dry rot call the same way: find where the water is actually getting in, remove only what's truly compromised, and rebuild so the entry point is corrected rather than just hidden under new paint.
Signs you may need dry rot repair
Most homeowners notice one of these first. On their own they can look minor — together, they usually mean water has been getting in longer than it looks.
Wood that feels spongy or gives easily when pressed with a screwdriver tip usually means decay fungus has already broken the fibers down enough to weaken the wood's structure.
Paint that keeps bubbling, cracking, or peeling in the exact same spot even after repainting is often a sign that moisture trapped in the wood underneath is pushing the finish back off.
A musty smell near an exterior wall, window, or crawlspace is frequently the first sign of active decay, since the fungus releases that odor as it breaks wood fiber down.
Wood that has cracked into a checkerboard or cube-like pattern across the grain is showing a classic sign of advanced decay, where fungus has broken the fibers down from the inside out.
Trim, siding, or fascia that has darkened or discolored in patches often marks a spot where water has been sitting against the wood long enough to start the decay process.
What causes dry rot repair to fail
Root cause
In the Pacific Northwest's wet climate, dry rot almost always starts with a water-entry point that was never sealed correctly — a gap in caulking, a missing kick-out flashing, a window that wasn't flashed on installation, or siding that traps moisture against the sheathing. Once wood framing sits above roughly 20% moisture content for an extended period, decay fungi can establish and spread, even into wood that looks fine from the outside.
How we diagnose it
On the estimate visit, we look for the visible signs above and probe suspect wood with a screwdriver or moisture meter to gauge how far decay has spread. When hidden damage is suspected — for example, behind siding that's showing staining but no obvious rot — we explain the inspection options and any cost before opening anything, so you're never surprised by a wall that's already been cut into.
How we repair it
Locate the water source
We trace how water is reaching the wood, not just where it ended up — a failed roof flashing can show up as rot ten feet away.
Remove decayed material only
Compromised wood is cut back to solid, undamaged material. Sound framing is never replaced needlessly.
Rebuild and correct the source
New framing, sheathing, or trim goes in to match existing dimensions, and the original entry point is corrected — flashing, caulking, or drainage — so it doesn't happen again.
Seal, finish, and document
Repaired areas are primed and painted to blend in, and you receive progress photos of what was found and what was replaced.
Recent dry rot repair projects
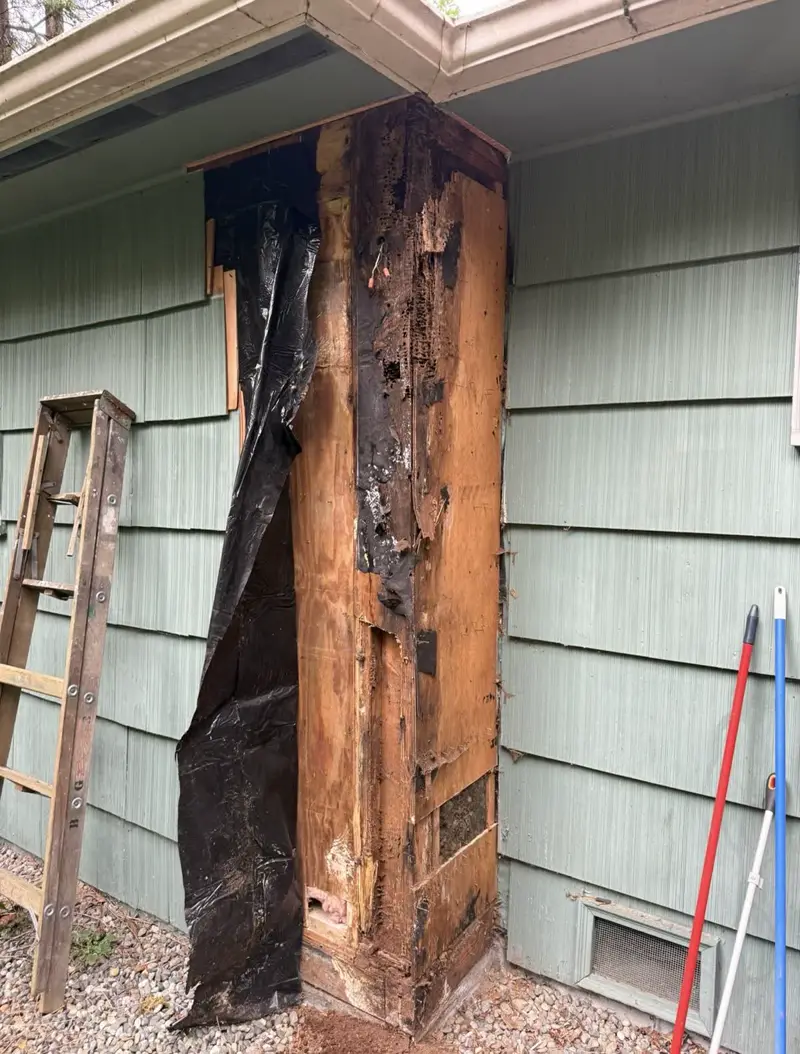
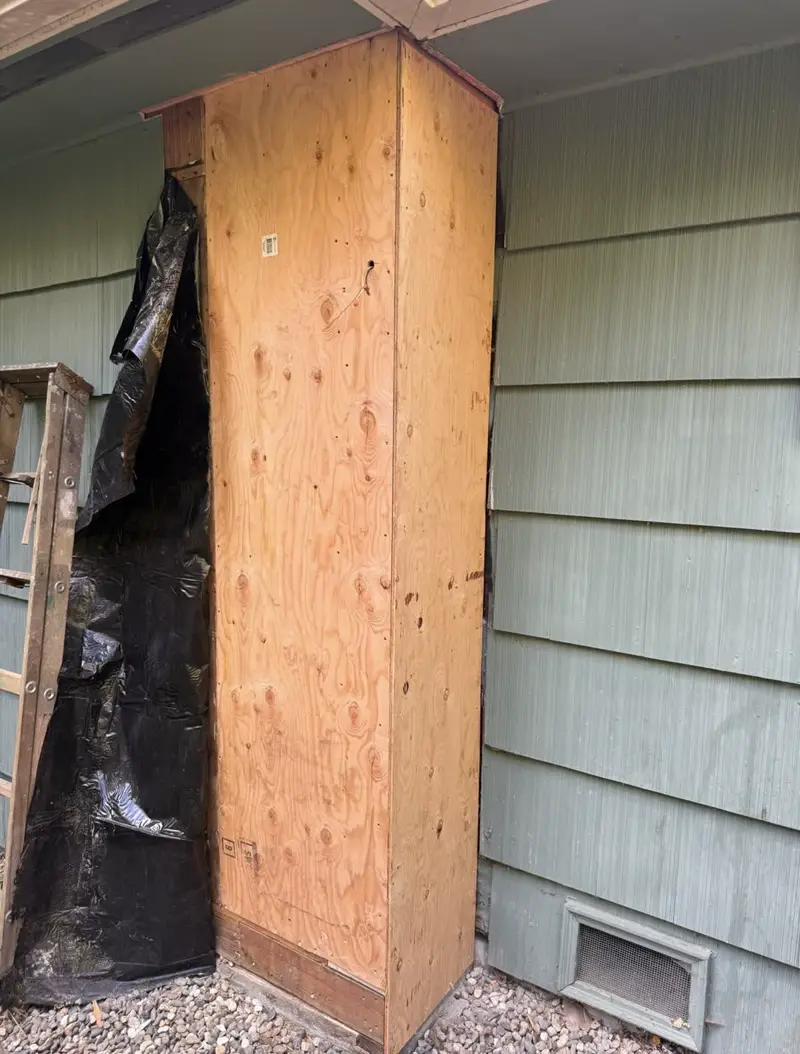
Every dry rot repair job includes
A written scope before we start, and every one of these as standard — not billed as extras once we're already on site.
A thorough on-site inspection and a written scope of work before any repair begins, so you know exactly what we found and what we're proposing to fix.
Complete removal and proper disposal of decayed material, cut back to solid wood rather than patched over or left in place.
Framing and sheathing replacement sized and fastened to match your home's existing structure, not generic lumber that just happens to fit the gap.
Correction of the underlying moisture source — flashing, caulking, or drainage — so the same spot isn't decaying again within a year or two.
Primer and paint matched to your home's existing color on every repaired area, so the fix blends in rather than reading as an obvious patch.
A 24-month workmanship warranty covering the repair itself, both the labor performed and the materials we installed.
Backed by our 24-Month Workmanship Warranty
2 years on repairs; ask about coverage on new installs. Every dry rot repair project includes a written scope before work begins and photo documentation of what was found and repaired.
What homeowners say about our dry rot repair
“This concerns the work of a company hired to fix some troublesome spots on our home. They were able to rebuild and refinish a window frame that had deteriorated from weather damage over the years. They did an excellent job. That one fix made the house look better all around. The other fix was to…”
“Alex and his team did a great job fixing our siding and bottom door frame which had some rotting. They were professional, competitive in pricing and responsive. Highly recommend Eco Home Repair!”
“I hired Eco Home Repair to do a leak repair under my balcony, deck waterproofing and slope correction, and underlying rot repair. They were professional, quick, and fairly priced; kept me in the loop throughout the whole process and was honest about what needed to be done vs what was optional.”
5.0 average from 106 reviews on Google, Thumbtack, Angi, HomeAdvisor and Yelp. Reviews were left for Eco Home Repair LLC, the company behind Goodbye Rot. Read our reviews on Google.
Dry Rot Repair in the Puget Sound area: what you should know
Dry rot is wood decay caused by fungi that grow when wood stays above roughly 20% moisture for long periods. In the Puget Sound area, the long wet season from October to May gives those fungi months to work, so a small leak at a flashing detail can turn into soft sheathing and framing within a few years. The name is misleading: the wood looks dry and crumbly once the fungus has eaten it, but it was water that started the damage.
What causes it
Missing kick-out flashing
Where a lower roof edge stops at a wall, water runs straight into the siding unless a kick-out turns it into the gutter. This is the single most common source of hidden rot we open up.
Failed window and door flashing
Openings without sill pans or head flashing leak at the corners, and the framing under the window rots first.
Siding too close to grade or roofs
Wood and fiber cement wick water from soil, mulch, decks and roofing when they touch or sit too close.
Caulk instead of flashing
Vents, pipes and lights sealed only with caulk start leaking when the caulk shrinks, usually within a few years.
What our dry rot repair includes
- Probing and moisture readings to map the damage
- Photos of every damaged area before we close it up
- Removal of rotted siding, trim, sheathing and framing back to sound wood
- Replacement framing, sister studs and treated plates where needed
- New sheathing, weather barrier and flashing tied in shingle-style
- Siding and trim matched to your house, primed and painted
- Cleanup and haul-away of all debris
How to prevent it
- Keep gutters clean and downspouts extended away from the house
- Check caulk and paint at windows and trim every fall
- Keep mulch and soil at least 6 inches below the siding
- Have a contractor add kick-out flashing anywhere a roof edge meets a wall
- Repaint before the paint film fails, about every 7 to 10 years
What affects the cost
Cost depends on how far the rot has spread, not on how bad the surface looks. A soft spot under one window may only need trim and a small sheathing patch; the same stain at a roof-to-wall joint can hide rotted studs and plates. We price after probing and, when needed, opening a small inspection area, so the written estimate reflects what is actually behind the siding.
How long it takes
Most single-area dry rot repairs take one to three days. Larger repairs that involve framing, shoring or multiple walls take about a week. Paint can add a day when weather allows; in winter we prime and seal, and finish paint on the next dry stretch.
Why homeowners choose Goodbye Rot
We fix the cause, not just the surface. Every dry rot repair job starts with a free on-site inspection, moisture readings and photos, and you get a written scope and price before work begins. We are licensed, bonded and insured in Washington, and our repairs carry a 24-month workmanship warranty.
A professional repair starts by finding the moisture path
Rot is the symptom. The cause is water that gets in and cannot get out. Before we cut anything, we trace where the water enters: a roof-to-wall joint, a window corner, a deck ledger, a gutter that overflows. Replacing wood without fixing that path means the same repair comes back in a few years.
Where rot hides on the Puget Sound area homes
Roof-to-wall joints
Where a lower roof meets a wall without kick-out flashing.
Window and door corners
Bottom corners of trim and sills, especially without sill pans.
Deck ledgers and thresholds
Where decks attach to the house and at deck door sills.
Bottom of walls
Where siding sits close to soil, mulch, patios or roofs.
Fascia and rafter tails
Behind gutters that overflow or have no drip edge.
Porch columns and posts
At the base where they sit on concrete.
Moisture damage rarely belongs to just one surface
Water that rots trim usually reaches the sheathing behind it, and water that rots sheathing often reaches the framing. That is why our dry rot repair often connects to other work:
Repair or replace: how we decide
Small, shallow decay
Minor surface decay on trim can sometimes be cut out and patched with epoxy consolidant and filler, then primed and painted.
Soft trim or siding
Replaced with new material, often PVC or fiber cement trim that will not rot again.
Soft sheathing
Cut back to solid wood and replaced with new OSB or plywood, with barrier lapped in.
Rotted framing
Replaced or sistered with new lumber, with temporary support when it carries load.
We always show you photos of what we find, so you can see why a piece is being repaired or replaced.
How to keep rot from coming back
Keep water moving
Clean gutters, extend downspouts and keep soil and mulch below the siding.
Watch shaded surfaces
North walls and walls under trees stay damp longest. Check them each fall.
Fix small failures early
Cracked caulk, peeling paint and soft trim are cheap to fix and expensive to ignore.
Dry Rot Repair questions
Is dry rot the same as termite damage?
Can you repair just the rotted section, or do you replace the whole wall?
Why does dry rot keep coming back after I've patched it myself?
Do you offer a free inspection for dry rot?
You may also need
Siding Repair & Replacement
Cedar, composite, and lap siding matched to your home's existing look.
Siding Repair & Replacement detailsStructural Repairs
Studs, sills, and framing replaced where rot reached the bones.
Structural Repairs detailsWaterproofing & Flashing
Flashing and drainage details that stop the next leak before it starts.
Waterproofing & Flashing detailsDry Rot Repair by city
What we run into with dry rot repair shifts from one city to the next — lot, tree cover, and how close a house sits to water all change what we find.
Everett
Dry Rot Repair in EverettMarysville
Dry Rot Repair in MarysvilleLake Stevens
Dry Rot Repair in Lake StevensMill Creek
Dry Rot Repair in Mill CreekMukilteo
Dry Rot Repair in MukilteoSnohomish
Dry Rot Repair in SnohomishLynnwood
Dry Rot Repair in LynnwoodEdmonds
Dry Rot Repair in EdmondsMountlake Terrace
Dry Rot Repair in Mountlake TerraceArlington
Dry Rot Repair in ArlingtonStanwood
Dry Rot Repair in StanwoodWoodinville
Dry Rot Repair in WoodinvilleBothell
Dry Rot Repair in BothellKenmore
Dry Rot Repair in KenmoreLake Forest Park
Dry Rot Repair in Lake Forest ParkShoreline
Dry Rot Repair in ShorelineSeattle
Dry Rot Repair in SeattleKirkland
Dry Rot Repair in KirklandRedmond
Dry Rot Repair in RedmondBellevue
Dry Rot Repair in BellevueSammamish
Dry Rot Repair in SammamishMount Vernon
Dry Rot Repair in Mount VernonDry Rot Repair across our service area
Need dry rot repair? Tell us about it.
- Licensed, bonded & insured
- Free on-site estimates
- 24-month workmanship warranty
Get a free estimate for dry rot repair
We'll inspect the damage on-site, explain what caused it, and give you a clear written scope and price.